A
Amy
Guest
- Thread Author
- #1
Looking for coastal decorating inspiration? Create DIY nautical wall art with Mod Podge and simple supplies in this easy tutorial.
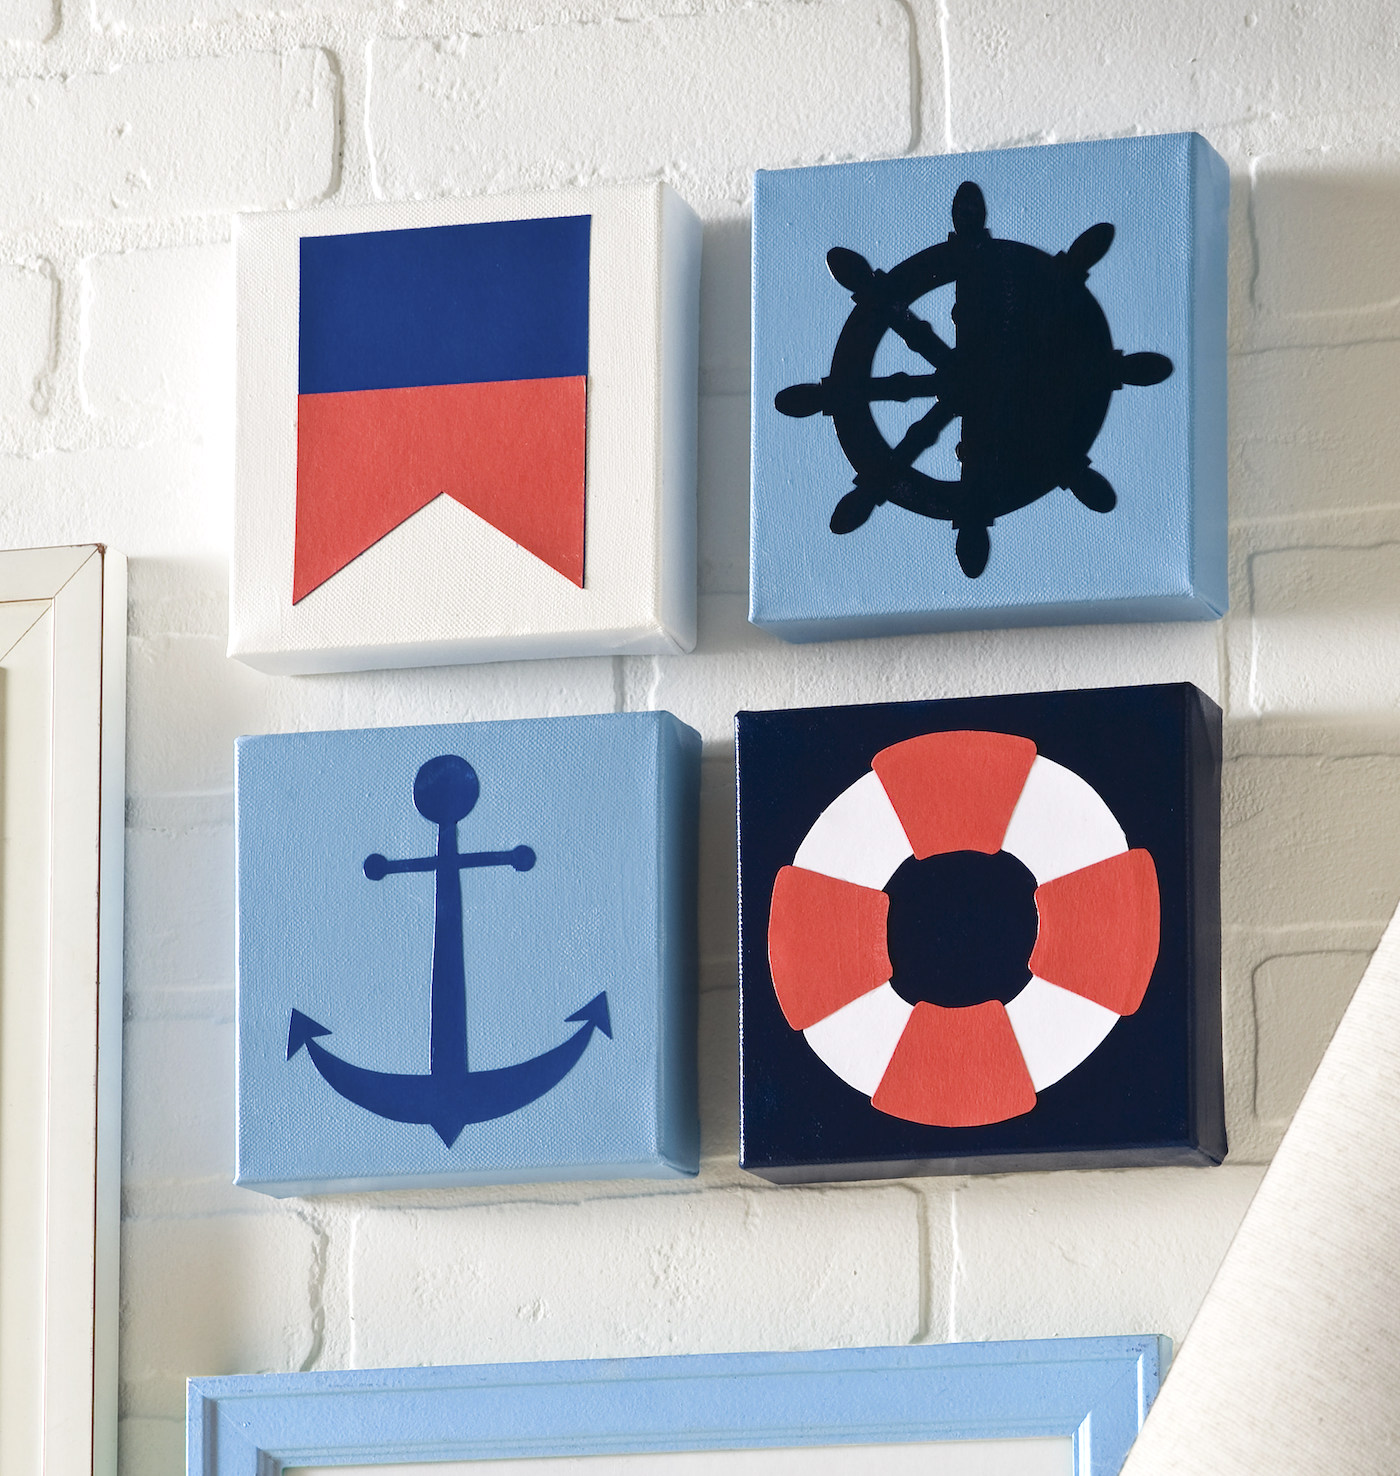
There’s something about nautical decorating that never seems to go out of style.
Maybe it’s the crisp blues and whites. Maybe it’s the beachy vibe. Maybe it’s because most of us would rather be sitting by the ocean than answering emails. Whatever the reason, nautical decor has a way of making a room feel relaxed, fresh, and a little bit like vacation.
The problem is that finding wall art you actually like can be surprisingly difficult.
Walk into a home decor store and you’ll usually find one of two extremes. Either everything is covered in anchors, ropes, and seashells to the point where your room starts looking like a themed seafood restaurant, or the artwork is beautiful but costs far more than you’re willing to spend.
That’s why I love making my own art.
Not only do you save money, but you get complete control over the colors, patterns, and style. Want something modern? Easy. Prefer a coastal cottage look? Go for it. Looking for beach decor that feels sophisticated instead of cheesy? You’re in the right place.
This DIY nautical wall art tutorial is one of my favorite ways to create custom art because it’s simple enough for beginners but looks polished enough to display proudly. The secret is combining painted canvas backgrounds with bold nautical silhouettes cut from cardstock.
Add Mod Podge (my favorite decoupage glue, of course), and suddenly you’ve got artwork that looks like it came from a boutique home store.
The original version uses a ship wheel, anchor, life preserver, and nautical flag, but you can choose whatever designs fit your style. Lighthouses, sailboats, whales, seashells, sea turtles, and beach grasses all work beautifully.
The color palette is another place where you can have fun. I went with a modern combination of navy, white, and light blue because it feels classic without being overly themed. But if you’re decorating a bathroom, beach house, guest room, or even a mantel area, you can easily adjust the colors to fit your space.
And let’s be honest: sometimes making your own art is just plain satisfying. There is something incredibly rewarding about looking at a blank canvas and turning it into decor that perfectly matches your home.
This project doesn’t require advanced artistic skills.
You don’t need to know how to paint a lighthouse. You don’t need to sketch a sailboat. You don’t even need particularly steady hands.
The silhouettes do all the hard work for you.
Simply print your chosen designs, cut them from scrapbook paper, and use Mod Podge to attach them to the painted canvases. The result is clean, graphic artwork that looks intentional and modern.
Before starting any DIY nautical wall art project, I recommend choosing your color palette first. In fact, that’s exactly how this project came together.
Classic nautical decorating usually includes:
You can even incorporate touches that remind you of the beach, like weathered driftwood tones or colors inspired by sand and sea glass.
Keeping your palette limited helps the finished artwork feel cohesive and professionally designed.

I stumbled across a beautiful nautical-inspired color combination and built the project around it. Sometimes inspiration works that way.
As you can see, the palette I selected is called “modern nautical” – and the rest is history.
I decided to use four silhouettes: a nautical flag, a ship steering wheel (is that what they are called?), an anchor and a life preserver. I’ve included some printable templates in the post.
Or if you know what you want, search for “anchor silhouette” (for example). There are a ton of free sources. Once you have decided what you want, print out and make sure the designs fit the canvases.
My favorite DIY projects are the ones that look much more complicated than they actually are.
This is definitely one of them.
With some paint, a few sheets of scrapbook paper, a canvas, and a bottle of Mod Podge, you can create custom wall decor that perfectly matches your home. It’s affordable, beginner-friendly, and a fun way to experiment with color and design.
A larger grouping makes a dramatic statement over a sofa, while smaller canvases work perfectly in a bathroom, hallway, or bedroom.
Get the printable how to below:

Print
Learn how to make nautical inspired wall art using the graphics of your choice! This tutorial shows you an easy method.
Course Wall Art
Prep Time 15 minutes minutes
Cook Time 3 hours hours 30 minutes minutes
Dry Time 1 hour hour
Total Time 4 hours hours 45 minutes minutes
Servings 4 canvases
Cost $20
What do you think? I love these canvases – the size, the silhouettes, the color palette . . . If you liked this summer inspired project, I’d love for you to check out these other ideas:
Anchor Sign • Beach Fairy Garden • Beach Letters • Cardboard Sandcastle • DIY Starfish • End of Summer Crafts • Nautical Cork Coasters • Nautical Pumpkin • Ocean Resin Art • Seashell Ornaments • Shell Earrings • Sparkly Wall Decor
The post DIY Nautical Wall Art for a Coastal-Inspired Home appeared first on Mod Podge Rocks.
There’s something about nautical decorating that never seems to go out of style.
Maybe it’s the crisp blues and whites. Maybe it’s the beachy vibe. Maybe it’s because most of us would rather be sitting by the ocean than answering emails. Whatever the reason, nautical decor has a way of making a room feel relaxed, fresh, and a little bit like vacation.
The problem is that finding wall art you actually like can be surprisingly difficult.
Walk into a home decor store and you’ll usually find one of two extremes. Either everything is covered in anchors, ropes, and seashells to the point where your room starts looking like a themed seafood restaurant, or the artwork is beautiful but costs far more than you’re willing to spend.
That’s why I love making my own art.
Not only do you save money, but you get complete control over the colors, patterns, and style. Want something modern? Easy. Prefer a coastal cottage look? Go for it. Looking for beach decor that feels sophisticated instead of cheesy? You’re in the right place.
This DIY nautical wall art tutorial is one of my favorite ways to create custom art because it’s simple enough for beginners but looks polished enough to display proudly. The secret is combining painted canvas backgrounds with bold nautical silhouettes cut from cardstock.
Add Mod Podge (my favorite decoupage glue, of course), and suddenly you’ve got artwork that looks like it came from a boutique home store.
The original version uses a ship wheel, anchor, life preserver, and nautical flag, but you can choose whatever designs fit your style. Lighthouses, sailboats, whales, seashells, sea turtles, and beach grasses all work beautifully.
The color palette is another place where you can have fun. I went with a modern combination of navy, white, and light blue because it feels classic without being overly themed. But if you’re decorating a bathroom, beach house, guest room, or even a mantel area, you can easily adjust the colors to fit your space.
And let’s be honest: sometimes making your own art is just plain satisfying. There is something incredibly rewarding about looking at a blank canvas and turning it into decor that perfectly matches your home.
Why You’ll Love This DIY Nautical Wall Decor
This project doesn’t require advanced artistic skills.
You don’t need to know how to paint a lighthouse. You don’t need to sketch a sailboat. You don’t even need particularly steady hands.
The silhouettes do all the hard work for you.
Simply print your chosen designs, cut them from scrapbook paper, and use Mod Podge to attach them to the painted canvases. The result is clean, graphic artwork that looks intentional and modern.
Choosing a Nautical Color Palette
Before starting any DIY nautical wall art project, I recommend choosing your color palette first. In fact, that’s exactly how this project came together.
Classic nautical decorating usually includes:
- Navy blue
- White
- Red
- Light blue
- Sandy beige
You can even incorporate touches that remind you of the beach, like weathered driftwood tones or colors inspired by sand and sea glass.
Keeping your palette limited helps the finished artwork feel cohesive and professionally designed.
I stumbled across a beautiful nautical-inspired color combination and built the project around it. Sometimes inspiration works that way.
As you can see, the palette I selected is called “modern nautical” – and the rest is history.
Choosing the Art
I decided to use four silhouettes: a nautical flag, a ship steering wheel (is that what they are called?), an anchor and a life preserver. I’ve included some printable templates in the post.
Or if you know what you want, search for “anchor silhouette” (for example). There are a ton of free sources. Once you have decided what you want, print out and make sure the designs fit the canvases.
A Simple Project with Big Impact
My favorite DIY projects are the ones that look much more complicated than they actually are.
This is definitely one of them.
With some paint, a few sheets of scrapbook paper, a canvas, and a bottle of Mod Podge, you can create custom wall decor that perfectly matches your home. It’s affordable, beginner-friendly, and a fun way to experiment with color and design.
A larger grouping makes a dramatic statement over a sofa, while smaller canvases work perfectly in a bathroom, hallway, or bedroom.
Get the printable how to below:
DIY Nautical Wall Decor
Learn how to make nautical inspired wall art using the graphics of your choice! This tutorial shows you an easy method.
Course Wall Art
Prep Time 15 minutes minutes
Cook Time 3 hours hours 30 minutes minutes
Dry Time 1 hour hour
Total Time 4 hours hours 45 minutes minutes
Servings 4 canvases
Cost $20
Equipment
Ingredients
- 4 Canvas(es) square, 6" x 6"
- 4 pieces Scrapbook paper
- Craft paint
- Mod Podge Gloss
- Nautical silhouette clip art designs of your choice
Instructions
- Print out the nautical designs to fit your canvases. Match them up with the paper colors you'd like to use, and match those with the canvas paint colors you'd like to use.

- Paint your canvases using your paint and brush. Take a peek at the finished picture and you can see that I actually used three colors on my canvases: white, navy, and light blue. Let them dry.

- Trim down designs and secure them to the paper colors with painter's tape. Place on the cutting mat.

- The next part takes a little bit of time, but it's actually quite easy. Use your craft knife and scissors to carefully cut out your silhouettes from the scrapbook paper.

- Once your silhouettes are cut out, simply Mod Podge them to the fronts of the canvases. Let them dry.
- Apply sealing coats of Mod Podge to the canvases. Let dry completely before hanging.
What do you think? I love these canvases – the size, the silhouettes, the color palette . . . If you liked this summer inspired project, I’d love for you to check out these other ideas:
Anchor Sign • Beach Fairy Garden • Beach Letters • Cardboard Sandcastle • DIY Starfish • End of Summer Crafts • Nautical Cork Coasters • Nautical Pumpkin • Ocean Resin Art • Seashell Ornaments • Shell Earrings • Sparkly Wall Decor
The post DIY Nautical Wall Art for a Coastal-Inspired Home appeared first on Mod Podge Rocks.